> ## Documentation Index
> Fetch the complete documentation index at: https://tigerdata-747200db-chore-custom-colored-homepage.mintlify.site/llms.txt
> Use this file to discover all available pages before exploring further.
# Get started with Tiger Cloud
> Improve database performance with hypertables, time bucketing, compression and continuous aggregates.
export const TIME_BUCKET_CAP = 'Time bucket';
export const TIME_BUCKET = 'time bucket';
export const TIGER_POSTGRES = 'Tiger Postgres';
export const SCALE = 'Scale';
export const PRICING_PLAN = 'pricing plan';
export const HA_REPLICA = 'high-availability replica';
export const ENTERPRISE = 'Enterprise';
export const CONSOLE = 'Tiger Cloud Console';
export const COMPANY = 'TigerData';
export const CLOUD_LONG = 'Tiger Cloud';
export const CAGG = 'continuous aggregate';
export const COLUMNSTORE = 'columnstore';
export const ROWSTORE = 'rowstore';
export const HYPERTABLE = 'hypertable';
export const HYPERCORE_CAP = 'Hypercore';
export const HYPERTABLEs_0 = undefined
export const HYPERCORE = 'hypercore';
export const PG = 'Postgres';
export const TIMESCALE_DB = 'TimescaleDB';
export const SELF_LONG = 'self-hostedTimescaleDB';
export const SERVICE_LONG = 'Tiger Cloud service';
export const SERVICE_SHORT = 'service';
export const CONSOLE_LONG = 'Tiger Cloud Console';
{CLOUD_LONG} offers managed database services that provide a stable and reliable environment for your
applications. Each {SERVICE_SHORT} is an instance of {TIGER_POSTGRES}, a radically faster {PG} for
transactional, analytical and agentic workloads at scale.
{CLOUD_LONG} scales {TIGER_POSTGRES} to ingest and query vast amounts of live data. {CLOUD_LONG}
provides a range of features and optimizations that supercharge your queries while keeping the
costs down. For example:
* The {HYPERCORE} row-columnar engine in {TIMESCALE_DB} makes queries up to 350x faster, ingests 44% faster, and reduces
storage by 90%.
* Tiered storage in {CLOUD_LONG} seamlessly moves your data from high performance storage for frequently accessed data to
low cost bottomless storage for rarely accessed data.
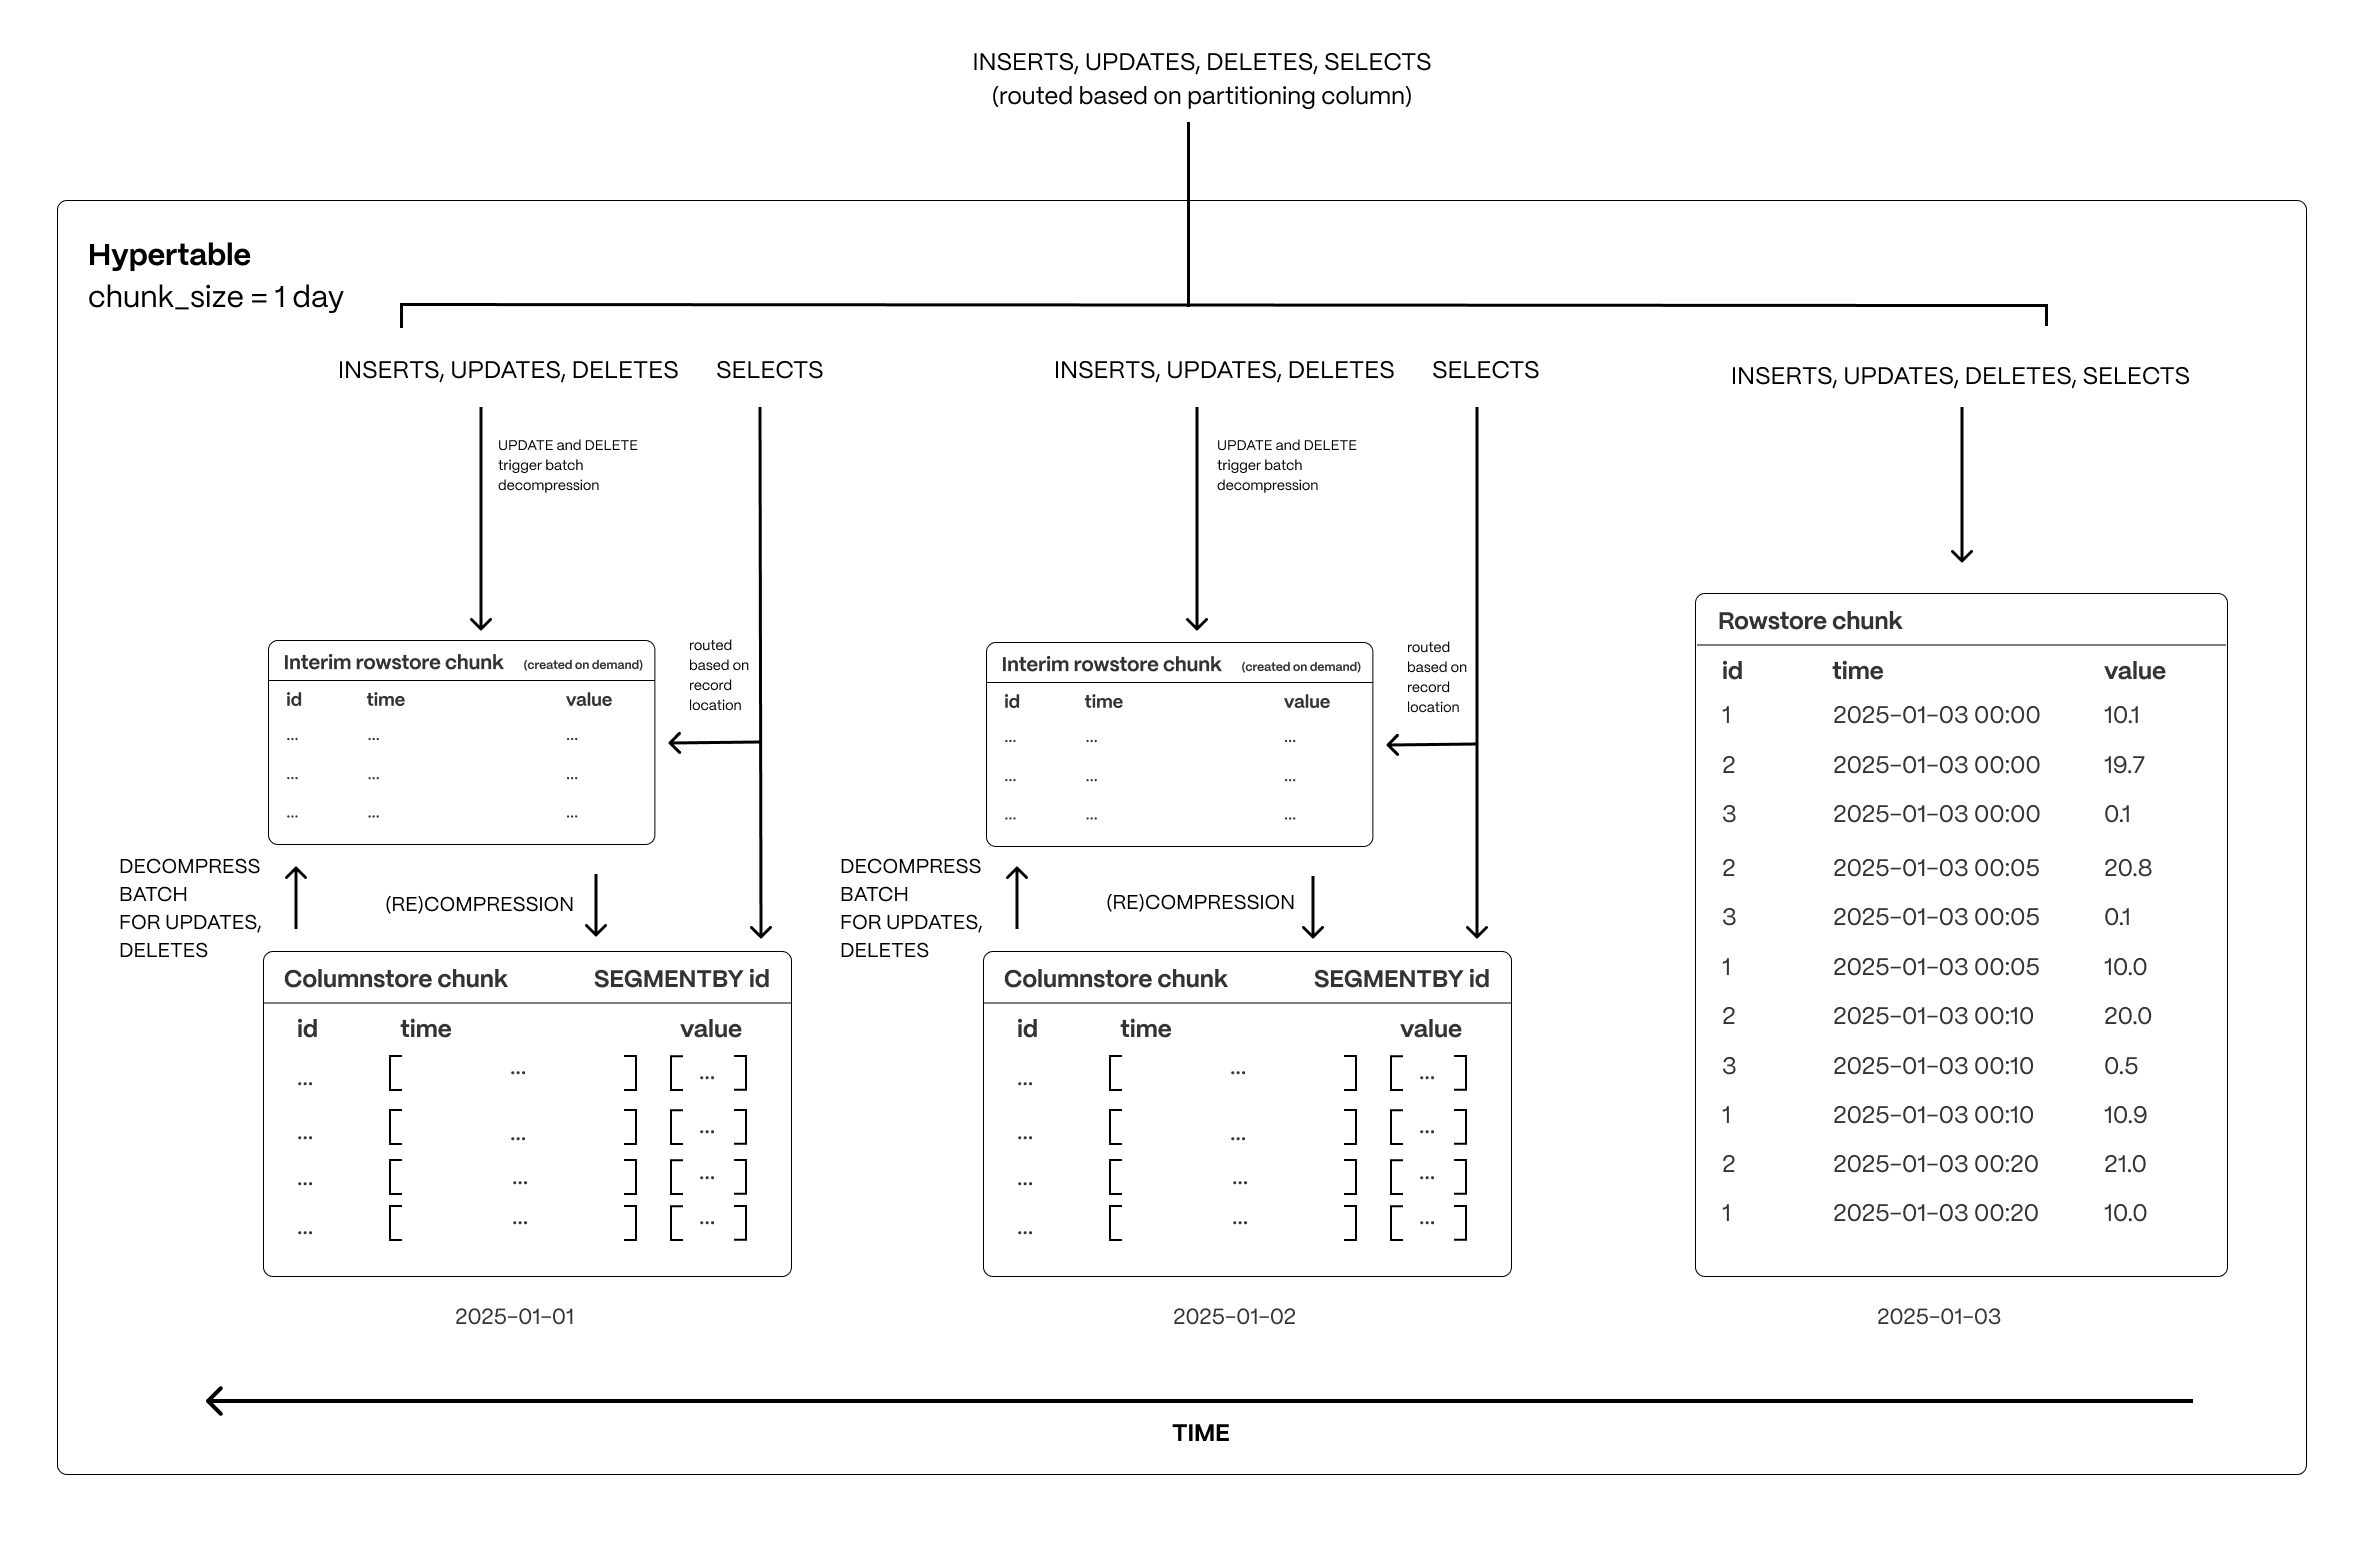
The following figure shows how {TIMESCALE_DB} optimizes your data for superfast real-time analytics:
This page shows you how to rapidly implement the features in {CLOUD_LONG} that enable you to
ingest and query data faster while keeping the costs low.
## Prerequisites
To follow the steps on this page:
* Create a target [{SERVICE_LONG}][create-service] with time-series and analytics enabled.
You need [your connection details][connection-info]. This procedure also
works for [{SELF_LONG}][enable-timescaledb].
[create-service]: /cloud/tiger/get-started/create-services
[enable-timescaledb]: /open-source/timescaledb/install-and-update/install-self-hosted
[connection-info]: /integrations/find-connection-details
## Optimize time-series data in {HYPERTABLE}s with {HYPERCORE}
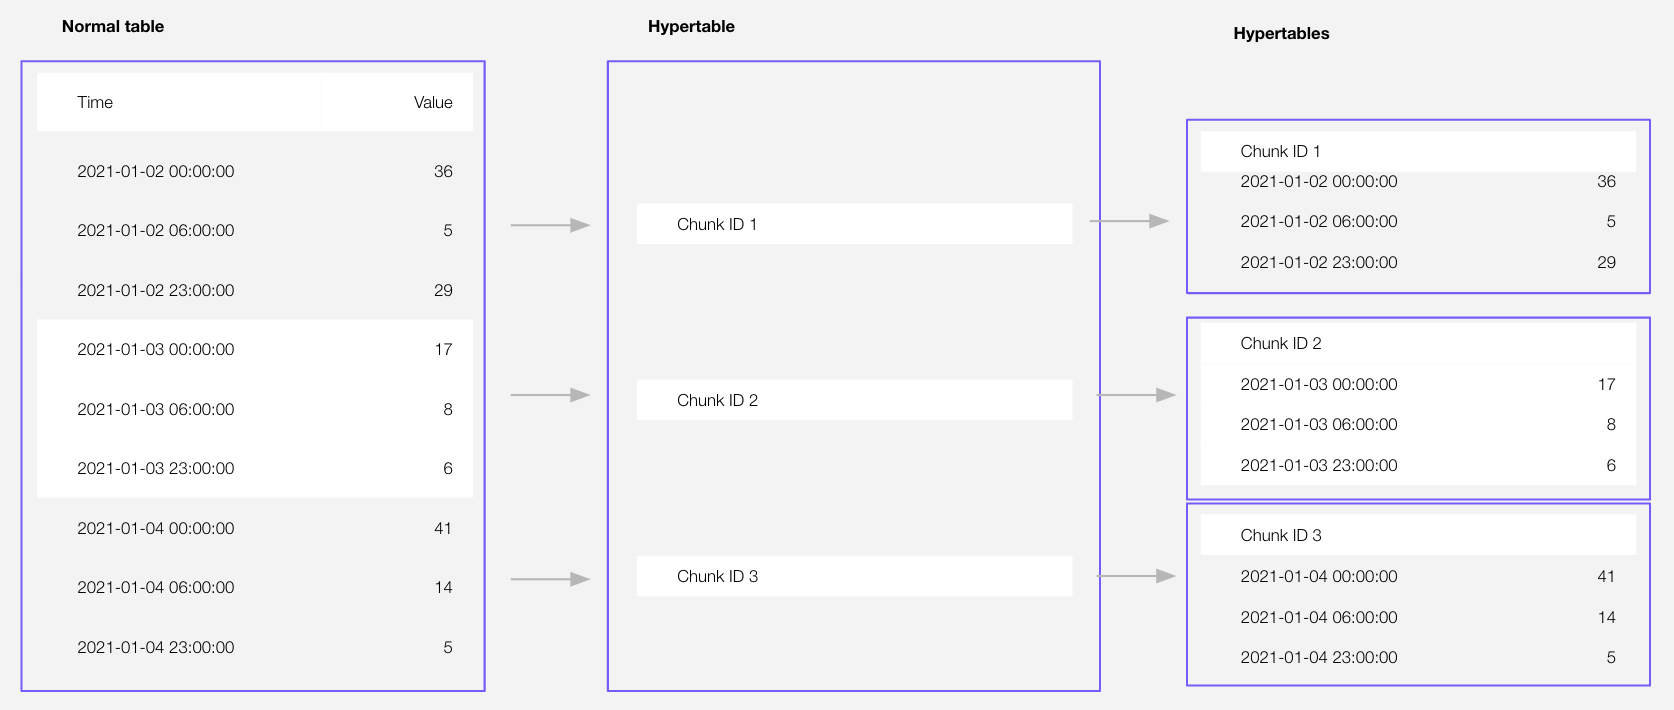
Time-series data represents the way a system, process, or behavior changes over time. {HYPERTABLE}\_CAPs are {PG} tables
that help you improve insert and query performance by automatically partitioning your data by time. Each {HYPERTABLE}
is made up of child tables called {CHUNK}s. Each {CHUNK} is assigned a range of time, and only
contains data from that range. When you run a query, {TIMESCALE_DB} identifies the correct {CHUNK} and runs the query on
it, instead of going through the entire table. You can also tune {HYPERTABLE}s to increase performance even more.
[{HYPERCORE_CAP}][hypercore] is the hybrid row-columnar storage engine in {TIMESCALE_DB} used by {HYPERTABLEs_0}. Traditional
databases force a trade-off between fast inserts (row-based storage) and efficient analytics
(columnar storage). {HYPERCORE_CAP} eliminates this trade-off, allowing real-time analytics without sacrificing
transactional capabilities.
{HYPERCORE_CAP} dynamically stores data in the most efficient format for its lifecycle:
* **Row-based storage for recent data**: the most recent chunk (and possibly more) is always stored in the {ROWSTORE},
ensuring fast inserts, updates, and low-latency single record queries. Additionally, row-based storage is used as a
writethrough for inserts and updates to columnar storage.
* **Columnar storage for analytical performance**: chunks are automatically compressed into the {COLUMNSTORE}, optimizing
storage efficiency and accelerating analytical queries.
Unlike traditional columnar databases, {HYPERCORE} allows data to be inserted or modified at any stage, making it a
flexible solution for both high-ingest transactional workloads and real-time analytics—within a single database.
[hypercore]: /use-timescale/hypercore/
{HYPERTABLE}\_CAPs exist alongside regular {PG} tables.
You use regular {PG} tables for relational data, and interact with {HYPERTABLE}s
and regular {PG} tables in the same way.
This section shows you how to create regular tables and {HYPERTABLE}s, and import
relational and time-series data from external files.
1. **Import some time-series data into {HYPERTABLE}s**
1. Unzip [crypto\_sample.zip](https://assets.timescale.com/docs/downloads/candlestick/crypto_sample.zip) to a ``.
This test dataset contains:
* Second-by-second data for the most-traded crypto-assets. This time-series data is best suited for
optimization in a [hypertable][hypertables-section].
* A list of asset symbols and company names. This is best suited for a regular relational table.
To import up to 100GB of data directly from your current {PG}-based database,
[migrate with downtime][migrate-with-downtime] using native {PG} tooling. To seamlessly import 100GB-10TB+
of data, use the [live migration][migrate-live] tooling supplied by {COMPANY}. To add data from non-{PG} data
sources, see [Import and ingest data][data-ingest].
2. Upload data into a {HYPERTABLE}:
To more fully understand how to create a {HYPERTABLE}, how {HYPERTABLE}s work, and how to optimize them for
performance by tuning {CHUNK} intervals and enabling chunk skipping, see
[the {HYPERTABLE}s documentation][hypertables-section].
The {CONSOLE} data upload creates {HYPERTABLE}s and relational tables from the data you are uploading:
1. In [{CONSOLE}][portal-ops-mode], select the {SERVICE_SHORT} to add data to, then click `Actions` > `Upload CSV`.
2. Drag `/tutorial_sample_tick.csv` to `Upload .CSV` and change `New table name` to `crypto_ticks`.
3. Enable `hypertable partition` for the `time` column and click `Upload CSV`.
The upload wizard creates a {HYPERTABLE} containing the data from the CSV file.
4. When the data is uploaded, close `Upload .CSV`.
If you want to have a quick look at your data, press `Run` .
5. Repeat the process with `/tutorial_sample_assets.csv` and rename to `crypto_assets`.
There is no time-series data in this table, so you don't see the `hypertable partition` option.
1. In Terminal, navigate to `` and connect to your {SERVICE_SHORT}.
```bash
psql -d "postgres://:@:/"
```
You use your [connection details][connection-info] to fill in this {PG} connection string.
2. Create tables for the data to import:
* For the time-series data:
1. In your sql client, create a {HYPERTABLE}:
Create a [{HYPERTABLE}][hypertables-section] for your time-series data using [CREATE TABLE][hypertable-create-table].
For [efficient queries][secondary-indexes], remember to `segmentby` the column you will
use most often to filter your data. For example:
```sql
CREATE TABLE crypto_ticks (
"time" TIMESTAMPTZ,
symbol TEXT,
price DOUBLE PRECISION,
day_volume NUMERIC
) WITH (
tsdb.hypertable,
tsdb.partition_column='time',
tsdb.segmentby = 'symbol'
);
```
If you are self-hosting {TIMESCALE_DB} v2.19.3 and below, create a [{PG} relational table][pg-create-table],
then convert it using [create\_hypertable][create_hypertable]. You then enable {HYPERCORE} with a call
to [ALTER TABLE][alter_table_hypercore].
[pg-create-table]: https://www.postgresql.org/docs/current/sql-createtable.html
[create_hypertable]: /api/hypertable/create_hypertable/
[alter_table_hypercore]: /api/hypercore/alter_table/
* For the relational data:
In your sql client, create a normal {PG} table:
```sql
CREATE TABLE crypto_assets (
symbol TEXT NOT NULL,
name TEXT NOT NULL
);
```
3. Upload the dataset to your {SERVICE_SHORT}:
```sql
\COPY crypto_ticks from './tutorial_sample_tick.csv' DELIMITER ',' CSV HEADER;
```
```sql
\COPY crypto_assets from './tutorial_sample_assets.csv' DELIMITER ',' CSV HEADER;
```
2. **Have a quick look at your data**
You query {HYPERTABLE}s in exactly the same way as you would a relational {PG} table.
Use one of the following SQL editors to run a query and see the data you uploaded:
* **Data mode**: write queries, visualize data, and share your results in [{CONSOLE}][portal-data-mode] for all your {SERVICE_LONG}s.
* **SQL editor**: write, fix, and organize SQL faster and more accurately in [{CONSOLE}][portal-ops-mode] for a {SERVICE_LONG}.
* **psql**: easily run queries on your {SERVICE_LONG}s or self-hosted {TIMESCALE_DB} deployment from Terminal.
## Enhance query performance for analytics
{HYPERCORE}\_CAP is the {TIMESCALE_DB} hybrid row-columnar storage engine, designed specifically for real-time
analytics and
powered by time-series data. The advantage of {HYPERCORE} is its ability to seamlessly switch between row-oriented and
column-oriented storage. This flexibility enables {TIMESCALE_DB} to deliver the best of both worlds, solving the key
challenges in real-time analytics.
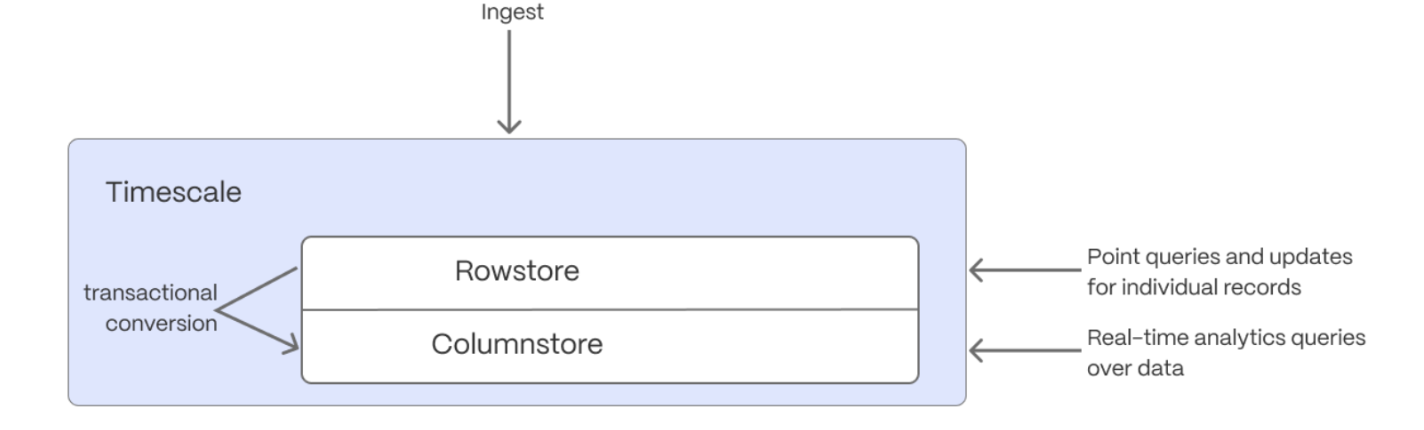
When {TIMESCALE_DB} converts {CHUNK}s from the {ROWSTORE} to the {COLUMNSTORE}, multiple records are grouped into a single row.
The columns of this row hold an array-like structure that stores all the data. Because a single row takes up less disk
space, you can reduce your {CHUNK} size by more than 90%, and can also speed up your queries. This helps you save on storage costs,
and keeps your queries operating at lightning speed.
{HYPERCORE} is enabled by default when you call [CREATE TABLE][hypertable-create-table]. Best practice is to compress
data that is no longer needed for highest performance queries, but is still accessed regularly in the {COLUMNSTORE}.
For example, yesterday's market data.
1. **Add a policy to convert {CHUNK}s to the {COLUMNSTORE} at a specific time interval**
For example, yesterday's data:
```sql
CALL add_columnstore_policy('crypto_ticks', after => INTERVAL '1d');
```
If you have not configured a `segmentby` column, {TIMESCALE_DB} chooses one for you based on the data in your
{HYPERTABLE}. For more information on how to tune your {HYPERTABLE}s for the best performance, see
[efficient queries][secondary-indexes].
2. **View your data space saving**
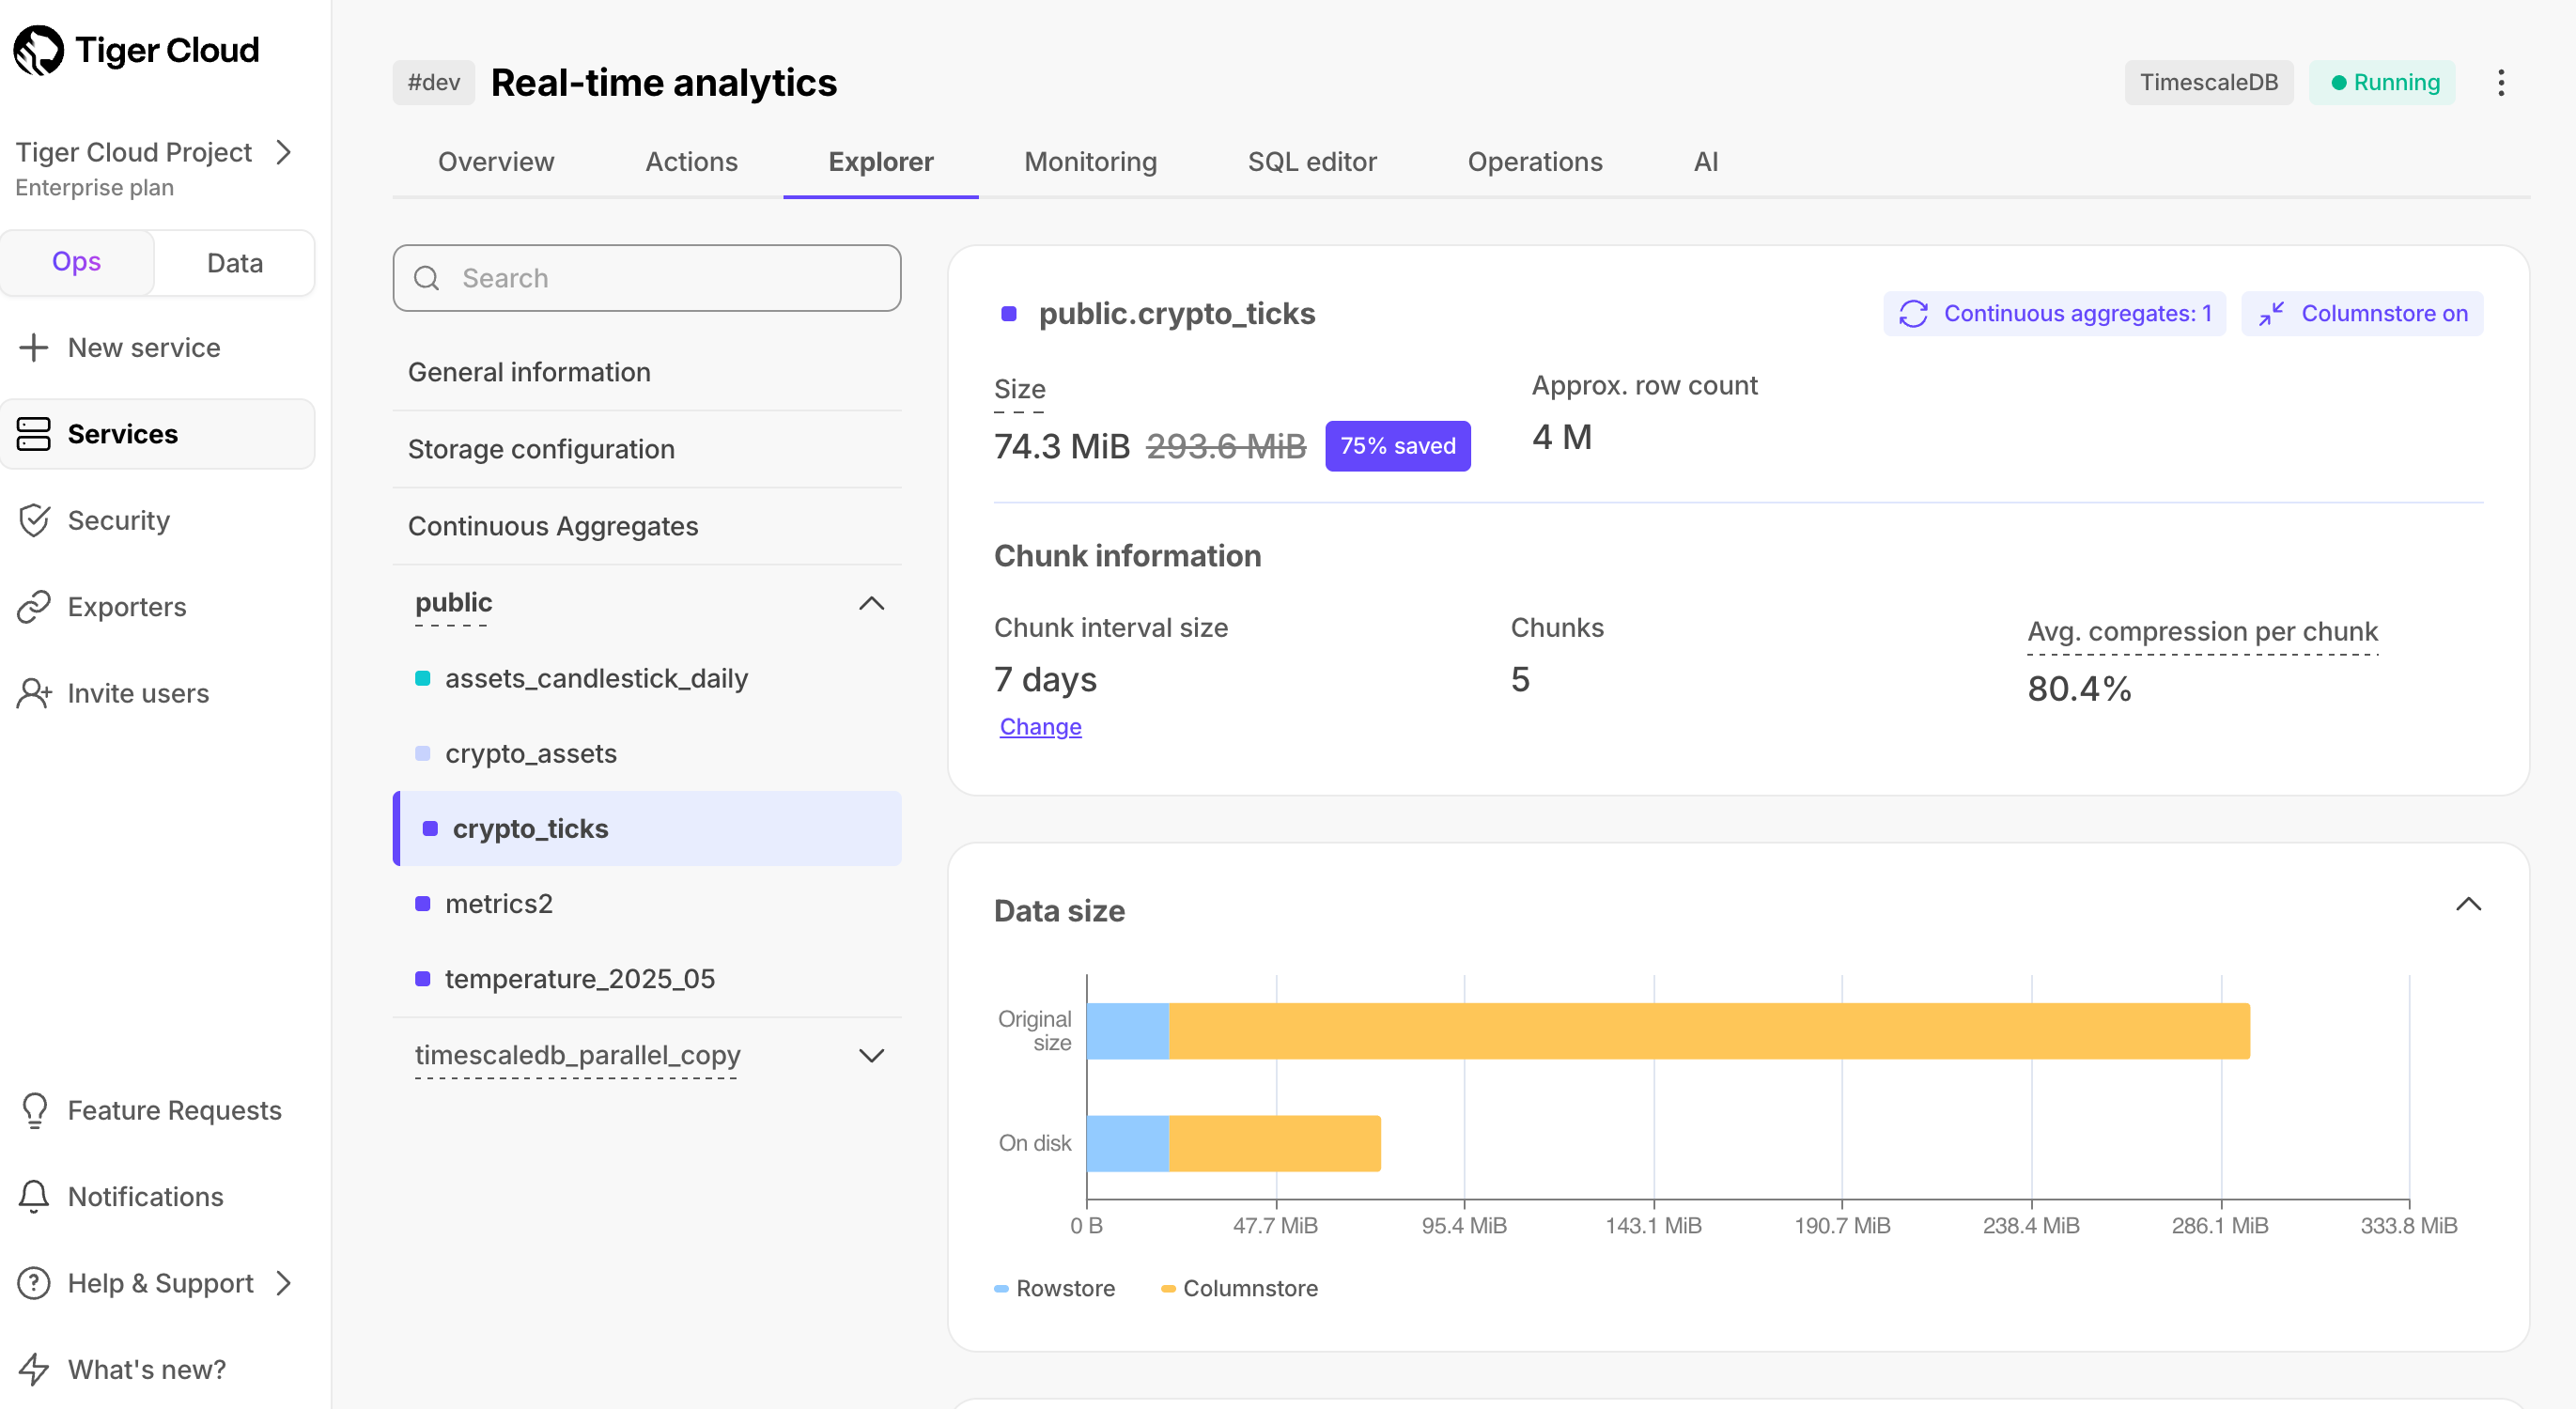
When you convert data to the {COLUMNSTORE}, as well as being optimized for analytics, it is compressed by more than
90%. This helps you save on storage costs and keeps your queries operating at lightning speed. To see the amount of space
saved, click `Explorer` > `public` > `crypto_ticks`.
## Write fast and efficient analytical queries
Aggregation is a way of combing data to get insights from it. Average, sum, and count are all
examples of simple aggregates. However, with large amounts of data, aggregation slows things down, quickly.
{CAGG}\_CAPs are a kind of {HYPERTABLE} that is refreshed automatically in
the background as new data is added, or old data is modified. Changes to your dataset are tracked,
and the {HYPERTABLE} behind the {CAGG} is automatically updated in the background.
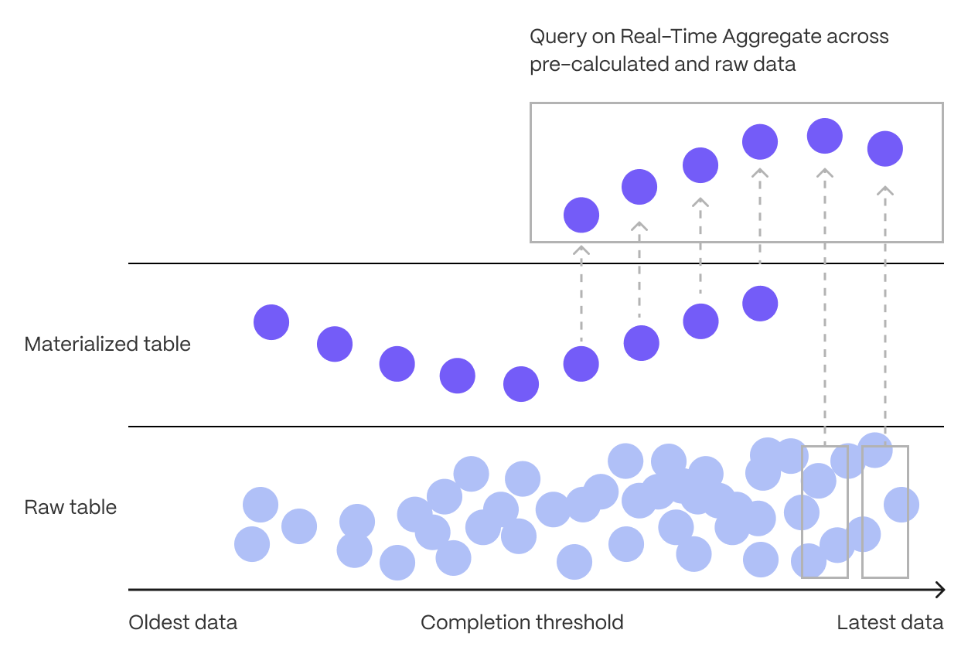
You create {CAGG}s on uncompressed data in high-performance storage. They continue to work
on [data in the {COLUMNSTORE}][test-drive-enable-compression]
and [rarely accessed data in tiered storage][test-drive-tiered-storage]. You can even
create [{CAGG}s on top of your {CAGG}s][hierarchical-caggs].
You use {TIME_BUCKET}s to create a {CAGG}. {TIME_BUCKET_CAP}s aggregate data in {HYPERTABLE}s by time
interval. For example, a 5-minute, 1-hour, or 3-day bucket. The data grouped in a {TIME_BUCKET} uses a single
timestamp. {CAGG}\_CAPs minimize the number of records that you need to look up to perform your
query.
This section shows you how to run fast analytical queries using {TIME_BUCKET}s and {CAGG} in
{CONSOLE}. You can also do this using psql.
1. **Connect to your {SERVICE_SHORT}**
In [{CONSOLE}][portal-data-mode], select your {SERVICE_SHORT} in the connection drop-down in the top right.
2. **Create a {CAGG}**
For a {CAGG}, data grouped using a {TIME_BUCKET} is stored in a
{PG} `MATERIALIZED VIEW` in a {HYPERTABLE}. `timescaledb.continuous` ensures that this data
is always up to date.
In data mode, use the following code to create a {CAGG} on the real-time data in
the `crypto_ticks` table:
```sql
CREATE MATERIALIZED VIEW assets_candlestick_daily
WITH (timescaledb.continuous) AS
SELECT
time_bucket('1 day', "time") AS day,
symbol,
max(price) AS high,
first(price, time) AS open,
last(price, time) AS close,
min(price) AS low
FROM crypto_ticks srt
GROUP BY day, symbol;
```
This {CAGG} creates the [candlestick chart][charts] data you use to visualize
the price change of an asset.
3. **Create a policy to refresh the view every hour**
```sql
SELECT add_continuous_aggregate_policy('assets_candlestick_daily',
start_offset => INTERVAL '3 weeks',
end_offset => INTERVAL '24 hours',
schedule_interval => INTERVAL '3 hours');
```
4. **Have a quick look at your data**
You query {CAGG}s exactly the same way as your other tables. To query the `assets_candlestick_daily`
{CAGG} for all assets:
1. **In [{CONSOLE}][portal-ops-mode], select the {SERVICE_SHORT} you uploaded data to**
2. **Click `Explorer` > `Continuous Aggregates` > `Create a Continuous Aggregate`** next to the `crypto_ticks` hypertable.
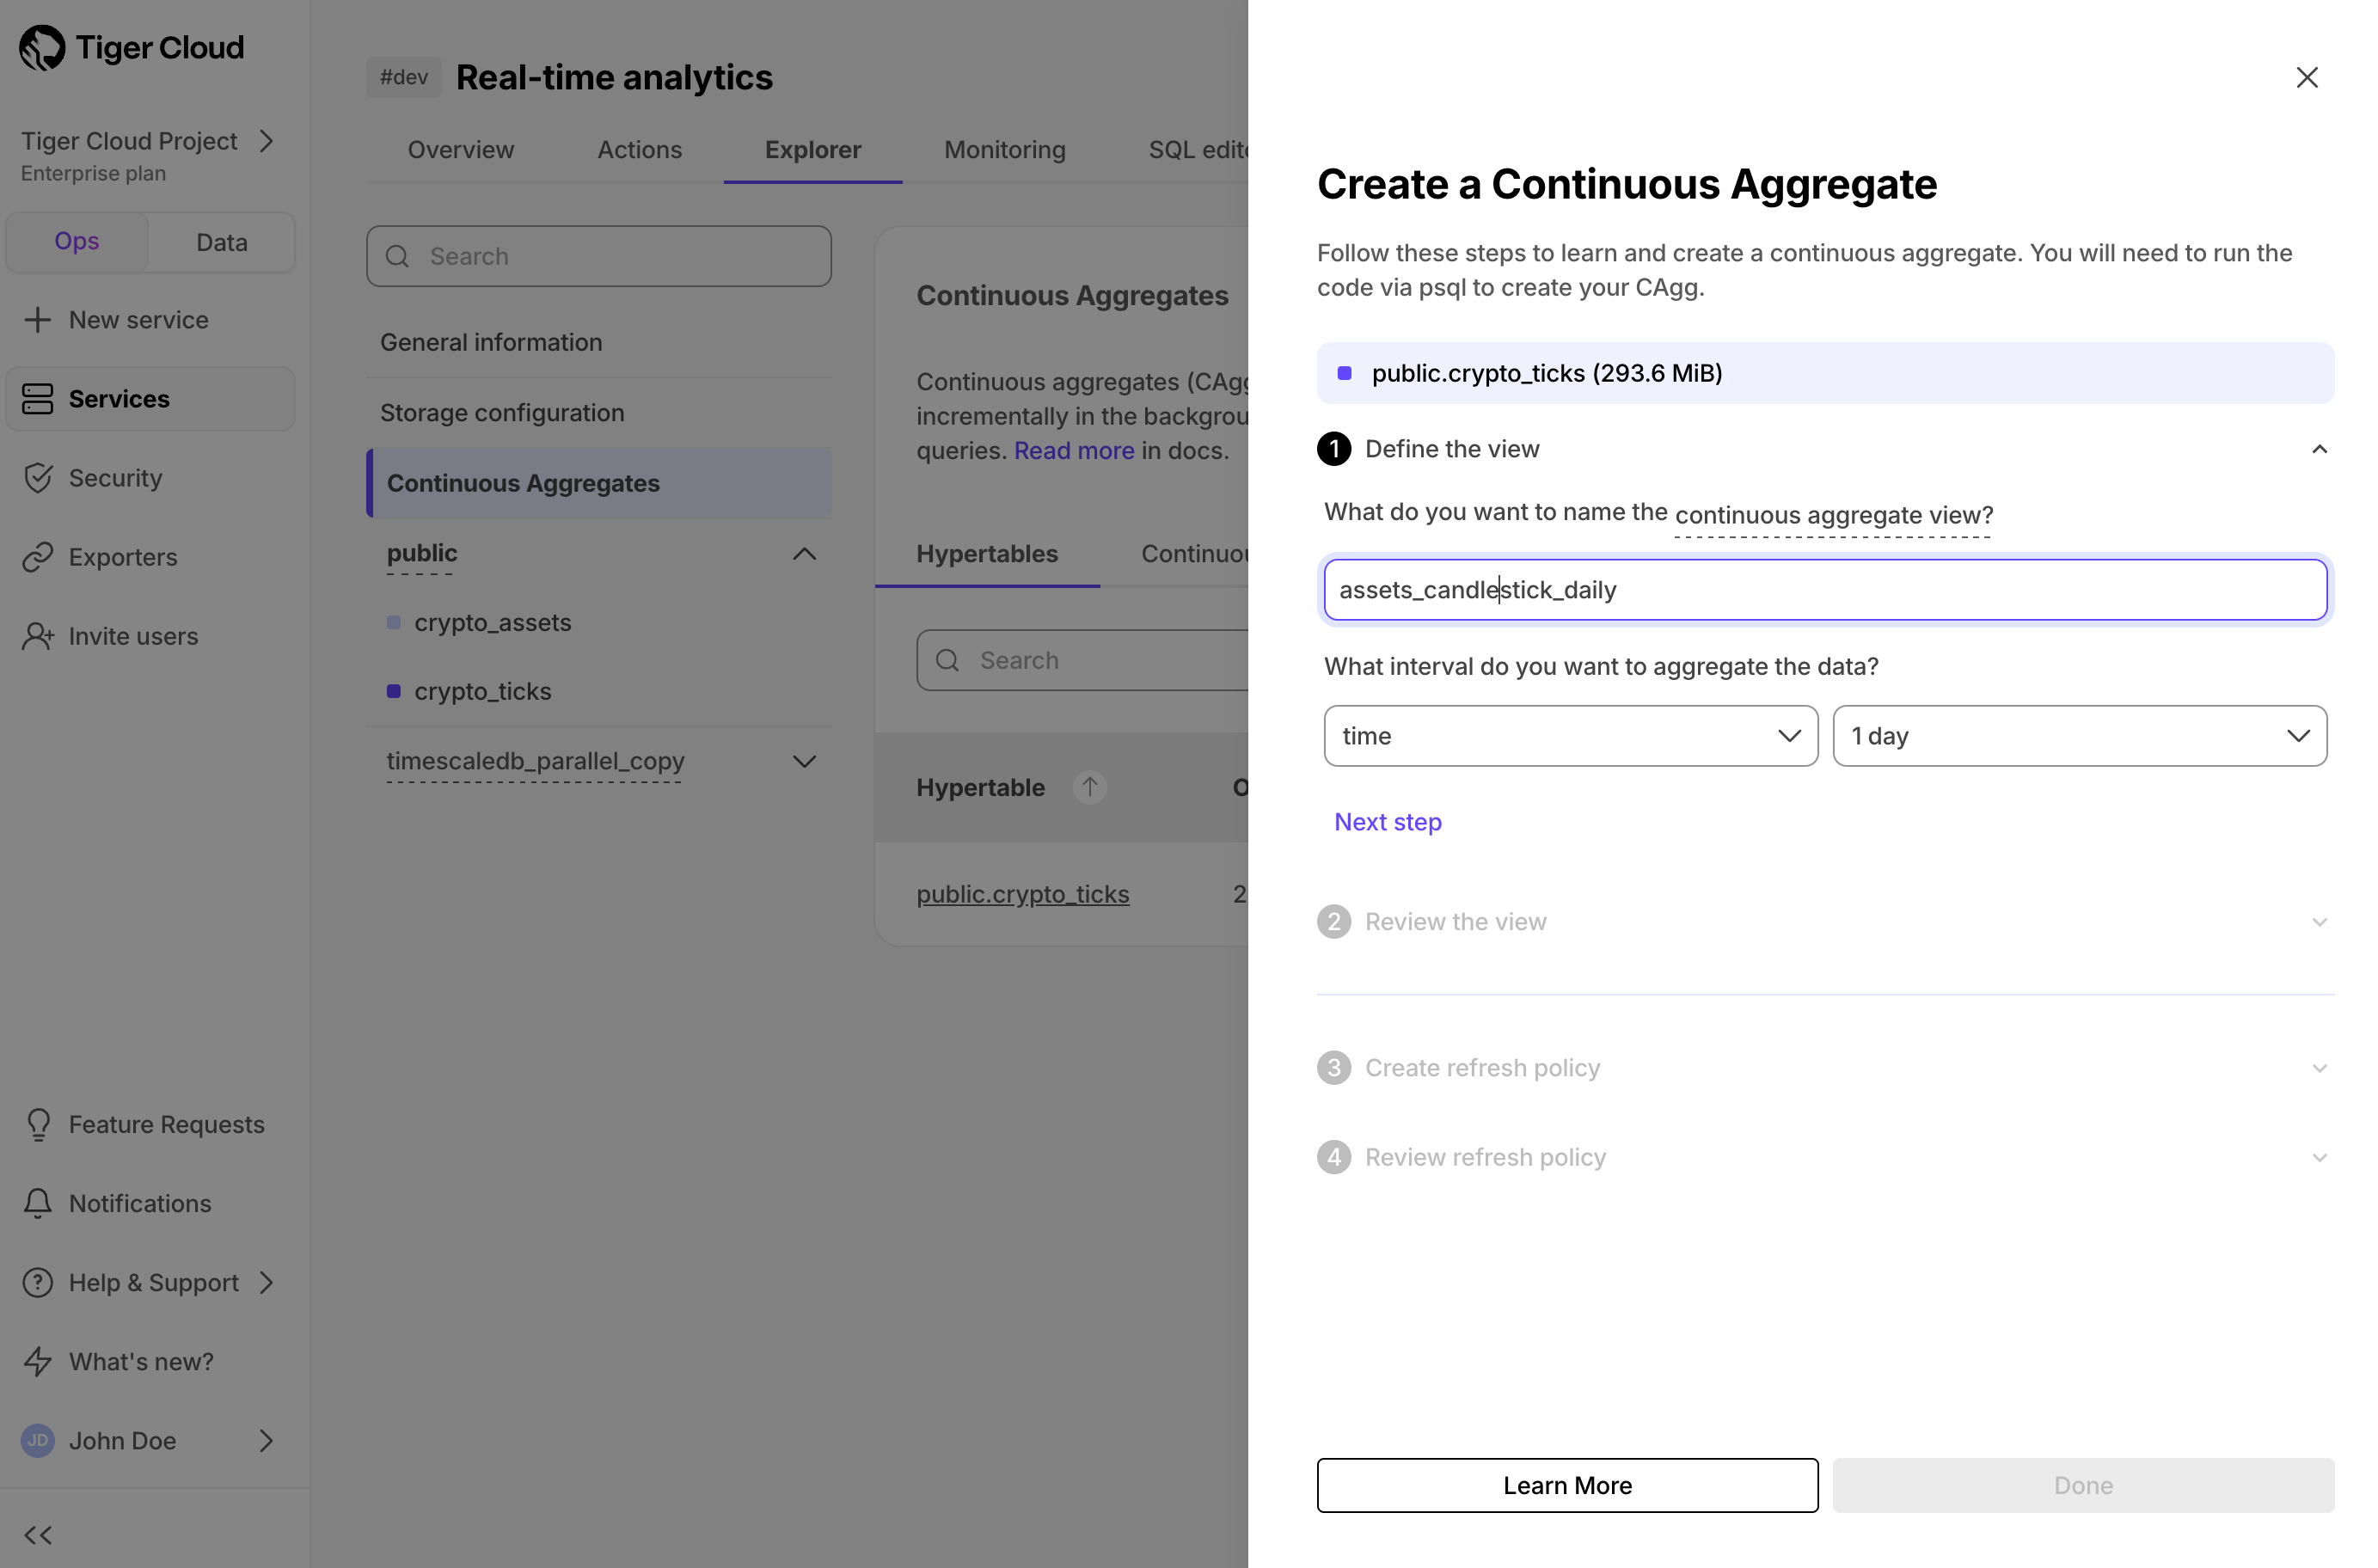
3. **Create a view called `assets_candlestick_daily` on the `time` column with an interval of `1 day`, then click `Next step`**
4. **Update the view SQL with the following functions, then click `Run`**
```sql
CREATE MATERIALIZED VIEW assets_candlestick_daily
WITH (timescaledb.continuous) AS
SELECT
time_bucket('1 day', "time") AS bucket,
symbol,
max(price) AS high,
first(price, time) AS open,
last(price, time) AS close,
min(price) AS low
FROM "public"."crypto_ticks" srt
GROUP BY bucket, symbol;
```
5. **When the view is created, click `Next step`**
6. **Define a refresh policy with the following values:**
* `How far back do you want to materialize?`: `3 weeks`
* `What recent data to exclude?`: `24 hours`
* `How often do you want the job to run?`: `3 hours`
7. **Click `Next step`, then click `Run`**
{CLOUD_LONG} creates the {CAGG} and displays the aggregate ID in {CONSOLE}. Click `DONE` to close the wizard.
To see the change in terms of query time and data returned between a regular query and
a {CAGG}, run the query part of the {CAGG}
( `SELECT ...GROUP BY day, symbol;` ) and compare the results.
## Slash storage charges
In the previous sections, you used {CAGG}s to make fast analytical queries, and
{HYPERCORE} to reduce storage costs on frequently accessed data. To reduce storage costs even more,
you create tiering policies to move rarely accessed data to the object store. The object store is
low-cost bottomless data storage built on Amazon S3. However, no matter the tier, you can
[query your data when you need][querying-tiered-data]. {CLOUD_LONG} seamlessly accesses the correct storage
tier and generates the response.
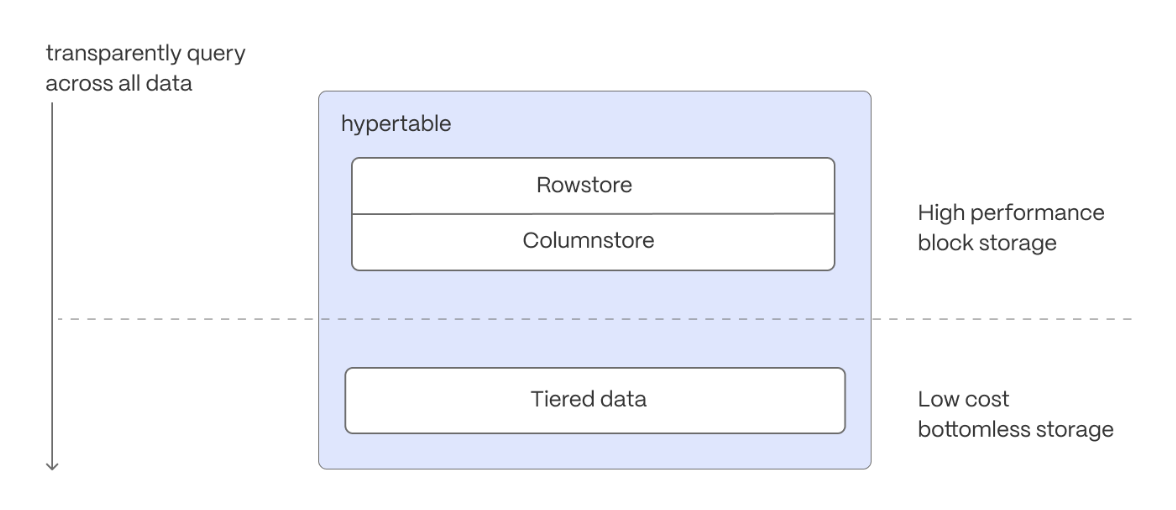
Data tiering is available in the [{SCALE} and {ENTERPRISE}][pricing-plans] {PRICING_PLAN}s for {CLOUD_LONG}.
To set up data tiering:
1. **Enable data tiering**
1. In [{CONSOLE}][portal-ops-mode], select the {SERVICE_SHORT} to modify.
2. In `Explorer`, click `Storage configuration` > `Tiering storage`, then click `Enable tiered storage`.
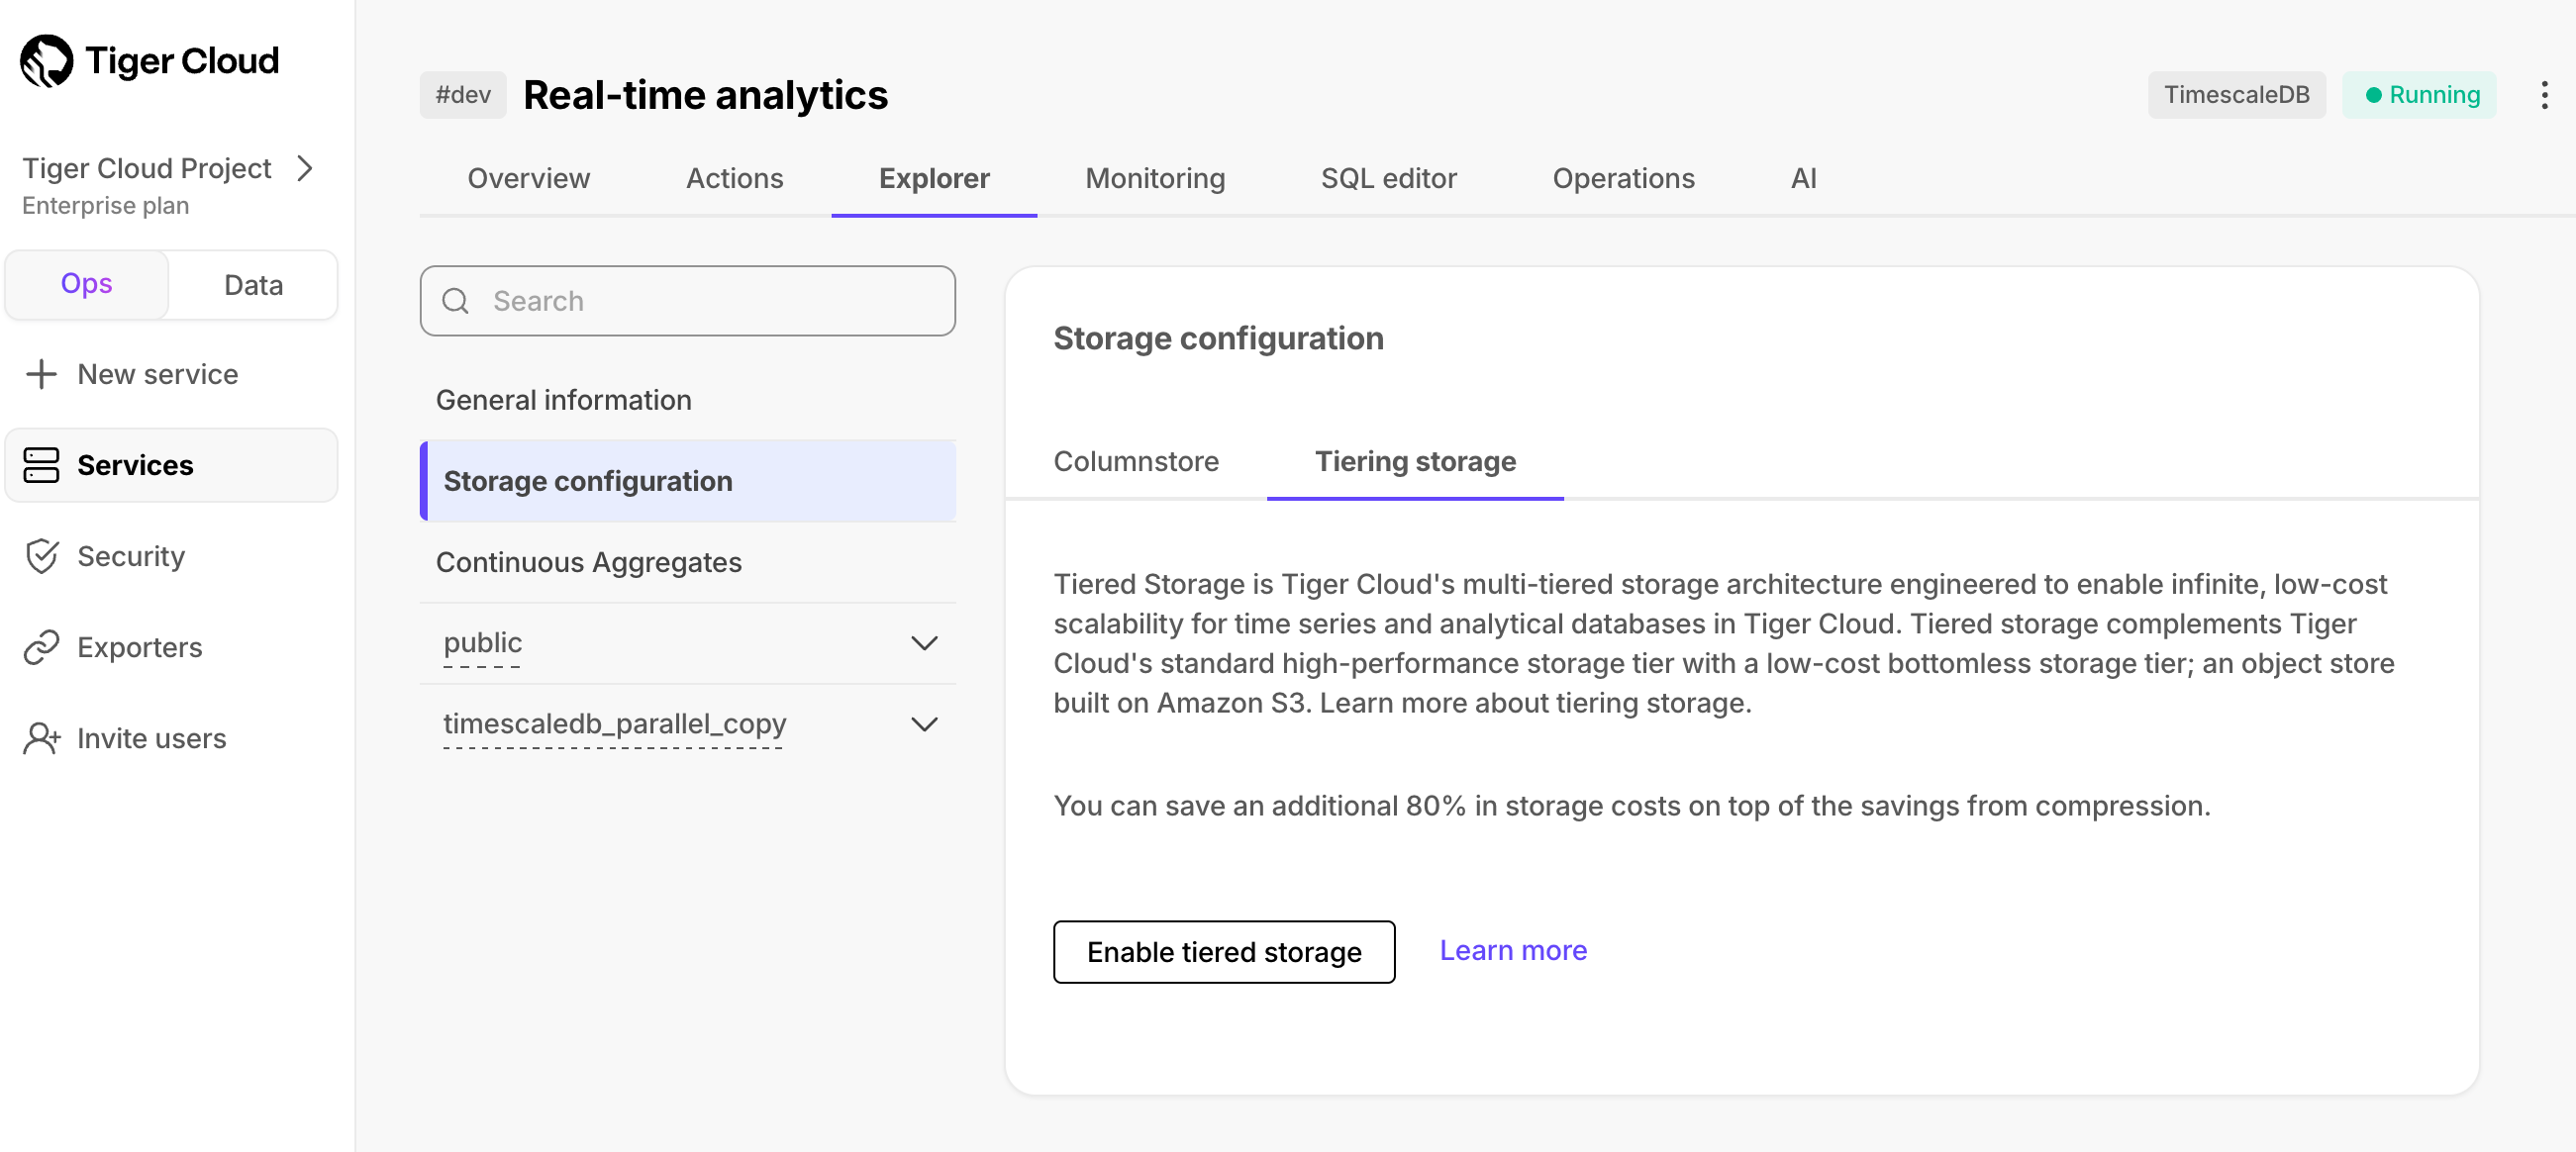
When tiered storage is enabled, you see the amount of data in the tiered object storage.
2. **Set the time interval when data is tiered**
In {CONSOLE}, click `Data` to switch to the data mode, then enable data tiering on a {HYPERTABLE} with the following query:
```sql
SELECT add_tiering_policy('assets_candlestick_daily', INTERVAL '3 weeks');
```
3. **Query tiered data**
You enable reads from tiered data for each query, for a session or for all future
sessions. To run a single query on tiered data:
1. Enable reads on tiered data:
```sql
set timescaledb.enable_tiered_reads = true
```
1. Query the data:
```sql
SELECT * FROM crypto_ticks srt LIMIT 10
```
1. Disable reads on tiered data:
```sql
set timescaledb.enable_tiered_reads = false;
```
For more information, see [Querying tiered data][querying-tiered-data].
## Reduce the risk of downtime and data loss
By default, all {SERVICE_LONG}s have rapid recovery enabled. However, if your app has very low tolerance
for downtime, {CLOUD_LONG} offers {HA_REPLICA}s. HA replicas are exact, up-to-date copies
of your database hosted in multiple AWS availability zones (AZ) within the same region as your primary node.
HA replicas automatically take over operations if the original primary data node becomes unavailable.
The primary node streams its write-ahead log (WAL) to the replicas to minimize the chances of
data loss during failover.
High availability is available in the [{SCALE} and {ENTERPRISE}][pricing-plans] {PRICING_PLAN}s for {CLOUD_LONG}.
1. In [{CONSOLE_LONG}][cloud-login], select the {SERVICE_SHORT} to enable replication for.
2. Click `Operations`, then select `High availability`.
3. Choose your replication strategy, then click `Change configuration`.
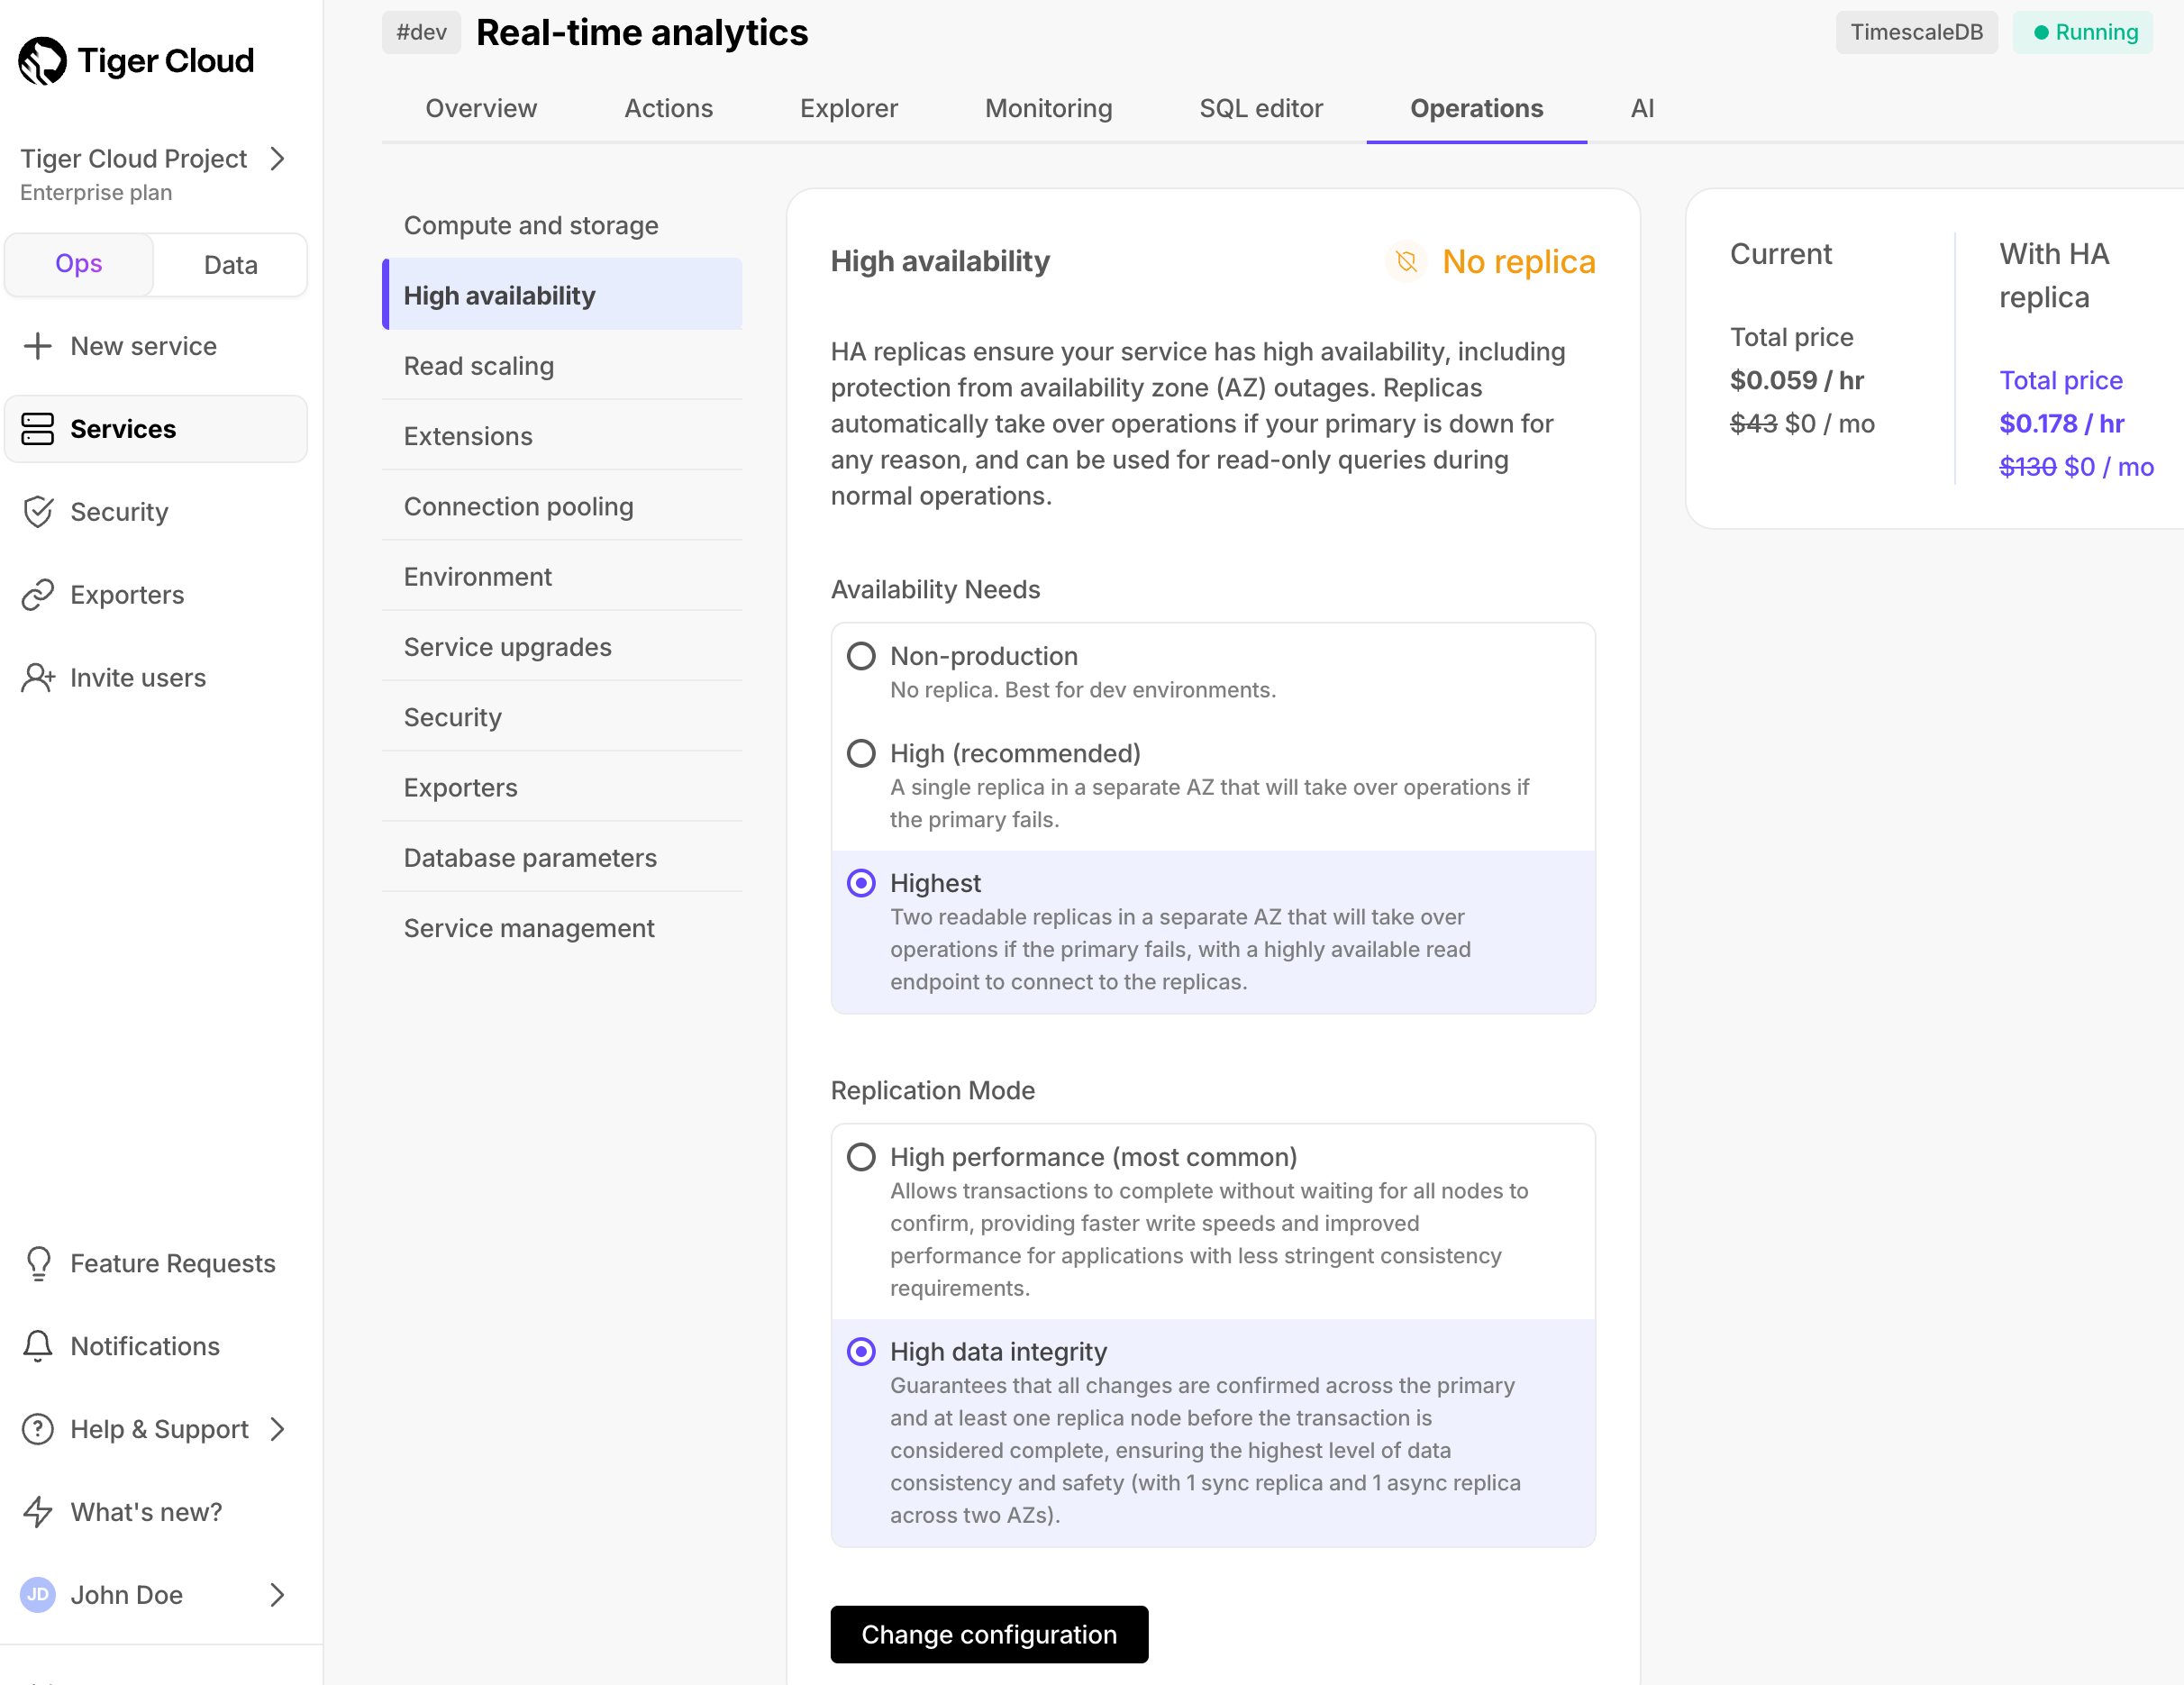
4. In `Change high availability configuration`, click `Change config`.
[cloud-login]: https://console.cloud.timescale.com
For more information, see [High availability][high-availability].
What next? See the [use case tutorials][tutorials], interact with the data in your {SERVICE_LONG} using
[your favorite programming language][connect-with-code], integrate your {SERVICE_LONG} with a range of
[third-party tools][integrations], plain old [Use {COMPANY} products][use-timescale], or dive into [the API][use-the-api].
[tutorials]: /tutorials/
[connect-with-code]: /getting-started/start-coding-with-timescale/
[integrations]: /integrations/
[use-the-api]: /api/
[use-timescale]: /use-timescale/
[connection-info]: /integrations/find-connection-details/
[create-a-service]: /getting-started/services/
[deploy-self-hosted]: /self-hosted//install/
[connect-to-your-service]: /getting-started/run-queries-from-console/
[portal-ops-mode]: https://console.cloud.timescale.com/dashboard/services
[portal-data-mode]: https://console.cloud.timescale.com/dashboard/services?popsql
[migrate-with-downtime]: /migrate/pg-dump-and-restore/
[migrate-live]: /migrate/live-migration/
[data-ingest]: /use-timescale/ingest-data/
[hypertables-section]: /use-timescale/hypertables/
[test-drive-enable-compression]: /getting-started/try-key-features-timescale-products/#enhance-query-performance-for-analytics
[test-drive-tiered-storage]: /getting-started/try-key-features-timescale-products/#slash-storage-charges
[data-tiering]: /use-timescale/data-tiering/
[compression]: /use-timescale/compression/
[hierarchical-caggs]: /use-timescale/continuous-aggregates/hierarchical-continuous-aggregates/
[charts]: https://www.investopedia.com/terms/c/candlestick.asp
[hierarchical-storage]: https://en.wikipedia.org/wiki/Hierarchical_storage_management
[querying-tiered-data]: /use-timescale/data-tiering/querying-tiered-data/
[data-tiering]: /use-timescale/data-tiering/
[pricing-plans]: /about/pricing-and-account-management
[querying-tiered-data]: /use-timescale/data-tiering/querying-tiered-data/
[high-availability]: /use-timescale/ha-replicas/high-availability/
[sign-up]: https://console.cloud.timescale.com/signup
[job]: /api/actions/add_job/
[alter-table-arguments]: /api/hypercore/alter_table/#arguments
[add_columnstore_policy]: /api/hypercore/add_columnstore_policy/
[hypertables-section]: /use-timescale/hypertables/
[hypertable-create-table]: /api/hypertable/create_table/
[hypercore]: /use-timescale/hypercore/
[secondary-indexes]: /use-timescale/hypercore/secondary-indexes/